Different Programs to Take Screenshots#
 mpv#
mpv#
Official Webpage mpv.net (Windows GUI)
Setting up mpv:#
- First, we need to create a configuration file for storing mpv's settings.
- See this page from the mpv docs about configuration files and their location.
- Windows: the conf file should be at
%APPDATA%\mpv\mpv.confMac and Linux:~/.config/mpv/mpv.conf - Create an empty
mpv.conffile if it doesn't exist. - Copy paste the following code inside the conf file. Change the
screenshot-directoryfromD:\to your desired path.screenshot-format=png screenshot-directory="D:\" # Save screenshots in the pattern of 'filename-timestamp.png' screenshot-template="%F-%p" # Deactivate debanding --deband=no # Always use 8-bit depth to keep file size reasonable --screenshot-high-bit-depth=no
Setting up mpv.net:#
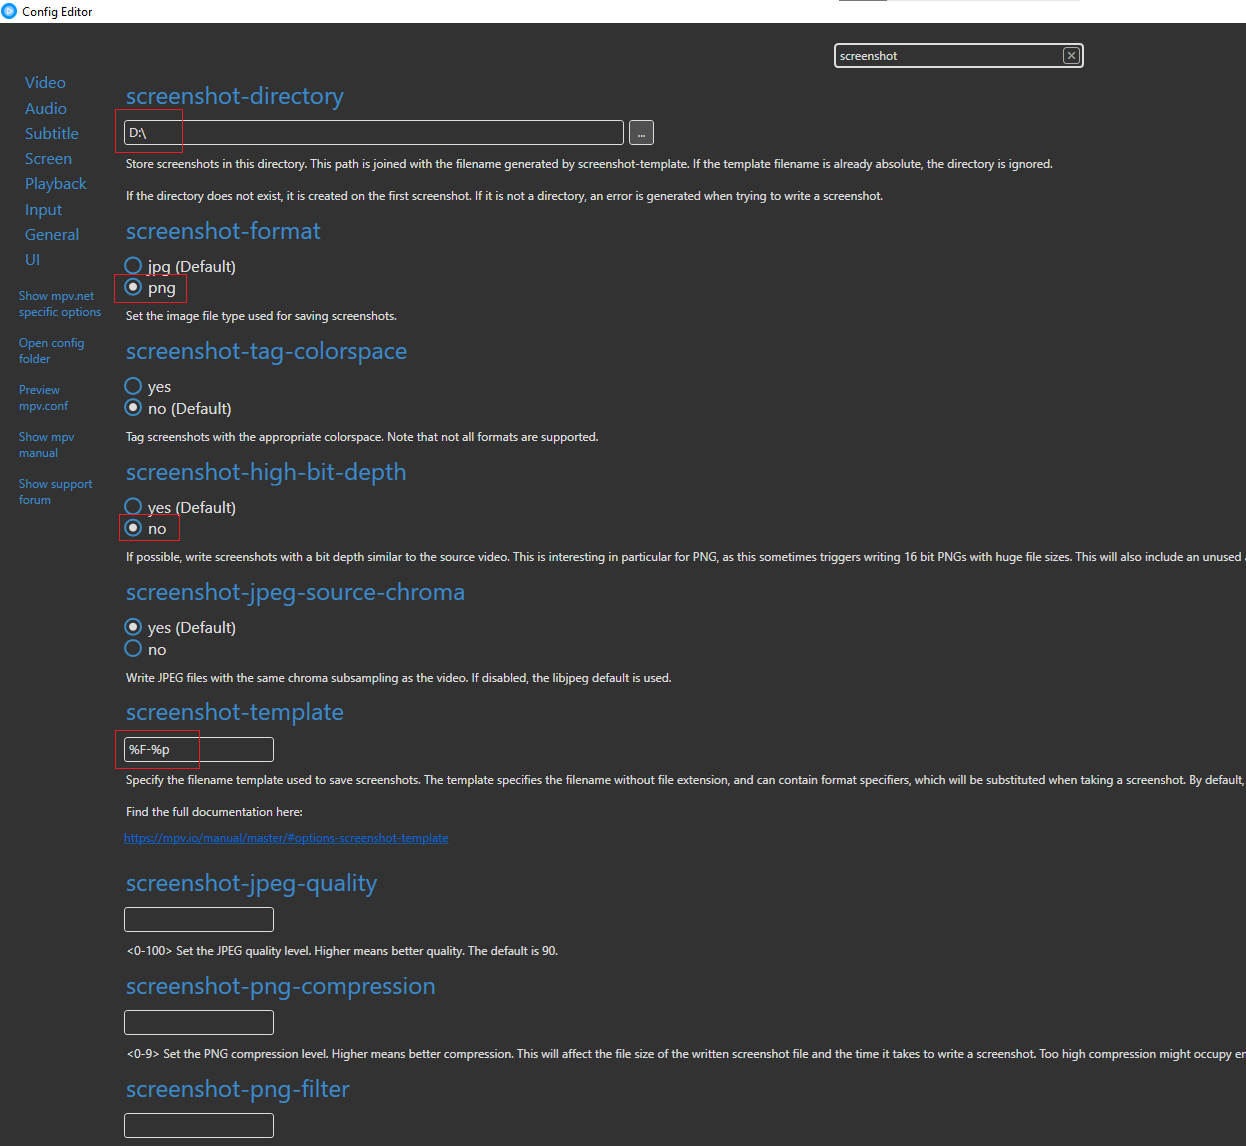
- If you prefer to use mpv.net, the Windows GUI fork, its settings are accessed by pressing
cor by right clicking inside the window >Settings>Show Config Editor. - Type "screenshot" in the search box.
- Set
screenshot-directoryto your desired folder,screenshot-formatto png,screenshot-high-bit-depthto no, andscreenshot-templateto%F-%p. - mpv.net comes with
debandset to no by default, but verify it just to be on the safe side. - Visual Guide: Click here
Taking the screenshots:#
- Drag and drop your file inside mpv's window.
- Find a suitable spot in the video of which you want to take a screenshot.
- Press Shift+S to take the screenshot. If you press lowercase s, the screenshot will be taken with subtitles enabled.
- mpv.net does not appear to support Shift+S, so remember to turn off the subtitles before pressing lowercase s.
MPC-HC#
Do NOT download from mpc-hc.org. That is an old build which is no longer updated.
Setting up MPC-HC#
- Two main video renderer options:
Enhanced Video Renderer (custom presenter)and madVR. "EVR (custom presenter)" is what MPC-HC comes with by default, while madVR can be optionally installed for better quality. - To change the setting for the video renderer, press O or go to the Menu bar >
View>Options. Then click onOutputin the sidebar. The renderer options will be in a dropdown underDirectShow Video. See this screenshot for help. - You need to restart MPC-HC if you switch the renderer.
- "EVR (custom presenter)" does not need any special setup.
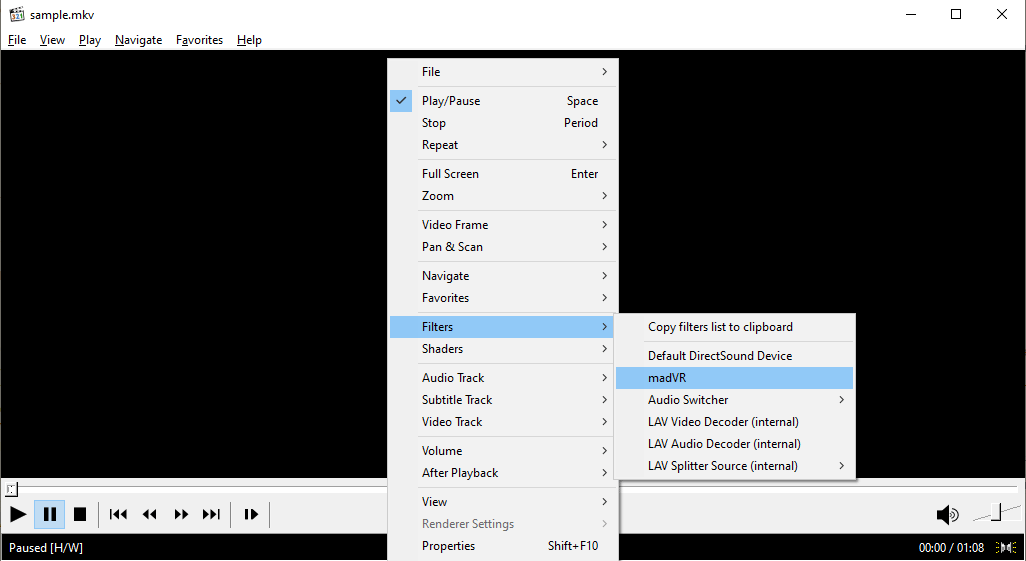
- For madVR:
- Open any video and pause it, then right click on the video, select
Filters>madVR. Then click onEdit Settings. - In the madVR settings window, go to
rendering>screenshots, select the checkbox forcreate screenshots with a custom zoom factor, and then select theencoded video sizeoption. - Also ensure that the
don't draw subtitlesanddon't draw OSDboxes are checked. - Visual Animated Guide: Click here
- Open any video and pause it, then right click on the video, select
Taking the screenshots#
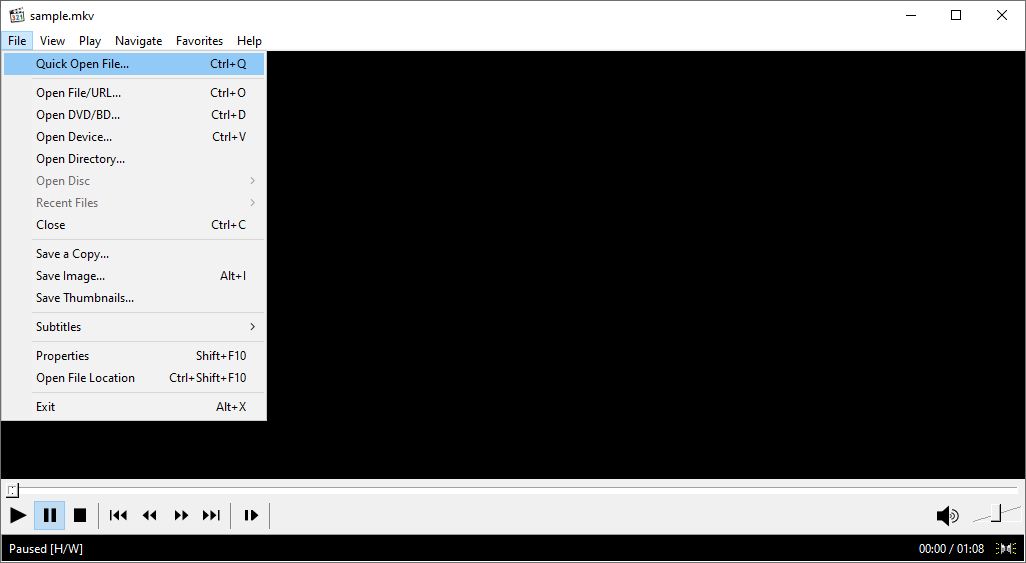
- Open the video by either pressing Ctrl+Q, or by going to the Menu bar >
File>Quick Open File, or by simply dragging and dropping the file inside the player window. - Find a suitable spot in the video of which you want to take a screenshot.
- To take the screenshot, press Alt+I or go to the Menu bar >
File>Save Image. - If you are using EVR (custom presenter), you must uncheck the
Include Subtitlesbox when saving the image. When using madVR, that box does not appear at all. - Visual Animated Guide: Click here
VLC Media Player#
Official Webpage Version 2.1.5
Info
The latest version of VLC takes screenshots correctly in display resolution for most types of content.
But some DVDs authored with improper aspect ratio play properly only in VLC 2.1.5. See the section at the end for more details.
Versions 2.2.0 to 2.2.4 take screenshots at storage resolution for all files, so they cannot be used for anamorphic files.
However, VLC fails at taking screenshots using the proper color matrix conversions, resulting in screenshots with inaccurate colors.
Therefore, it is advised to keep VLC as a backup option. Try one of the other programs on this page first for color-accurate screenshots.
Setting up VLC#
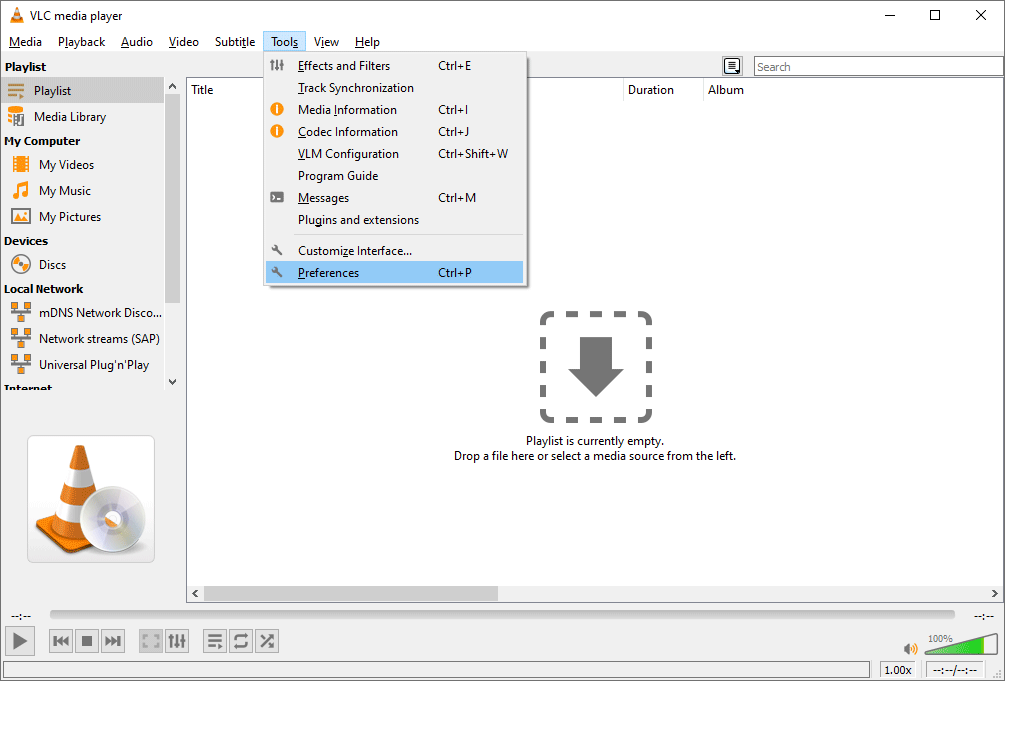
- Press Ctrl+P or go to the Menu bar, then
Tools>Preferences>Videotab. Under theFormatdropdown, ensure that png is selected. - On the same
Videotab, it is also recommended to setDeinterlacingto Off. - Make a note of the folder in the
Directoryfield, or change it if you wish. This is where VLC will save the screenshots.
Taking the screenshots#
- Open the video by either pressing Ctrl+O, or by going to the Menu bar >
Media>Open File, or by simply dragging and dropping the file inside the player window.- VLC also works well for streaming a file from your seedbox/server with http(s).
- To load a remote file, press Ctrl+N or click on the Menu bar >
Media>Open Network Stream. - You can also just copy the URL of the file in your browser, then switch to the VLC window, and press Ctrl+V.
- Ensure that any soft subtitles are turned off by going to the Menu bar >
Subtitle>Sub Track>Disable. This step must not be skipped. - Find a suitable spot in the video of which you want to take a screenshot.
- To take the screenshot, press Shift+S or go to the Menu bar >
Video>Take Snapshot. - The screenshot should now be saved in the directory set in the Preferences.
Visual Animated Guide: Click here
Version 2.1.5 is needed for improperly authored DVDs:
Some rare/old DVDs are improperly authored where the video plays in Storage Resolution (instead of Display Resolution) on most players, including latest VLC. Thus, the video playback and/or the screenshots are in bad aspect ratio.
Such DVDs will usually have a discrepancy in the Display aspect ratio between the main IFO file and the corresponding VOB files.
See this screenshot for an example. Properly authored DVDs should have the same value for Aspect ratio in both the IFO and the VOB. In addition, the Aspect ratio should have no value other than 16:9 or 4:3. If either of these conditions is not met, the DVD can be assumed to be improperly authored.
VLC 2.1.5 is usually able to play such DVDs properly.
You do not need to install this old version on your system — just download the portable version from the Version 2.1.5 link given at the top. Download the 7z or zip file instead of the exe.
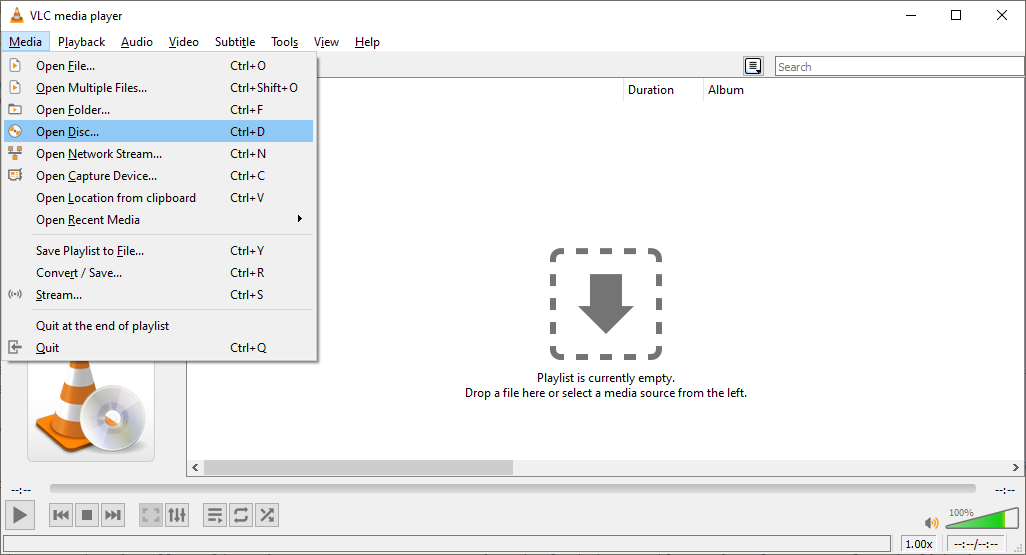
Important: You must load the DVD in VLC 2.1.5 as a disc for it to work properly. Opening the VOB file directly will once again give you bad aspect ratio screenshots. Do not use the Open Folder option either.
To load it as a disc, press Ctrl+D or go to the Menu bar > Media > Open Disc. See this screenshot for help.
Color Matrix#
Before going into more advanced tools like FFmpeg, AviSynth+ and Vapoursynth, here is a brief classification of the three main video color matrices:
BT.709#
- Almost all HD content, including those sourced from Blu-ray, HDTV and WEB-DLs (except HDR WEB-DLs).
- Most UHD content that is NOT HDR. Be careful with SDR UHD Blu-rays. Most of them are BT.709, but some rare ones are BT.2020. Check the file's mediainfo under
Matrix coefficients, or the BDInfo, to know the proper color matrix. -
Almost all SD content sourced from Blu-ray. Check if the
Matrix coefficientsin mediainfo says BT.709.If the
Matrix coefficientsfield is missing entirely, the file can be assumed to be BT.709, as long as it's sourced from Blu-ray and not DVD.
BT.601#
- In addition to DVDs, almost all other SD sources like VHS, LaserDisc, TV.
- Some groups encode SD content sourced from Blu-ray with a color conversion from BT.709 to BT.601. Such BT.601 files will say either
BT.601orBT.470 System B/GunderMatrix coefficientsin mediainfo.
BT.2020#
- Almost all HDR content, including UHD Blu-ray and HD/UHD WEB-DLs.
- Some rare SDR UHD Blu-rays.
How to check mediainfo for color matrix:
Look at the Matrix coefficients part in the video stream's mediainfo.
If there is no such line in the mediainfo, follow the classification mentioned above.
Video
ID                                       : 1
Format                                   : AVC
Format/Info                              : Advanced Video Codec
Format profile                           : High@L4
Format settings                          : CABAC / 4 Ref Frames
Format settings, CABAC                   : Yes
Format settings, Reference frames        : 4 frames
Codec ID                                 : V_MPEG4/ISO/AVC
Duration                                 : 1 h 30 min
Bit rate                                 : 4 245 kb/s
Width                                    : 1 920 pixels
Height                                   : 800 pixels
Display aspect ratio                     : 2.40:1
Frame rate mode                          : Constant
Frame rate                               : 23.976 (24000/1001) FPS
Color space                              : YUV
Chroma subsampling                       : 4:2:0
Bit depth                                : 8 bits
Scan type                                : Progressive
Bits/(Pixel*Frame)                       : 0.115
Stream size                              : 3.24 GiB (87%)
Default                                  : Yes
Forced                                   : No
Color range                              : Limited
Color primaries                          : BT.709
Transfer characteristics                 : BT.709
Matrix coefficients                      : BT.709
Video
ID                                       : 1
Format                                   : AVC
Format/Info                              : Advanced Video Codec
Format profile                           : High@L4.1
Format settings                          : CABAC / 16 Ref Frames
Format settings, CABAC                   : Yes
Format settings, ReFrames                : 16 frames
Codec ID                                 : V_MPEG4/ISO/AVC
Duration                                 : 1h 35mn
Bit rate                                 : 2 003 Kbps
Width                                    : 720 pixels
Height                                   : 362 pixels
Display aspect ratio                     : 2.35:1
Frame rate mode                          : Constant
Frame rate                               : 23.976 (24000/1001) fps
Color space                              : YUV
Chroma subsampling                       : 4:2:0
Bit depth                                : 8 bits
Scan type                                : Progressive
Bits/(Pixel*Frame)                       : 0.321
Stream size                              : 1.34 GiB (90%)
Default                                  : Yes
Forced                                   : No
Color range                              : Limited
Color primaries                          : BT.601 NTSC
Matrix coefficients                      : BT.601
Video
ID                                       : 1
ID in the original source medium         : 4113 (0x1011)
Format                                   : HEVC
Format/Info                              : High Efficiency Video Coding
Format profile                           : Main 10@L5.1@High
HDR format                               : SMPTE ST 2086, HDR10 compatible
Codec ID                                 : V_MPEGH/ISO/HEVC
Duration                                 : 1 h 55 min
Bit rate                                 : 49.9 Mb/s
Width                                    : 3 840 pixels
Height                                   : 2 160 pixels
Display aspect ratio                     : 16:9
Frame rate mode                          : Constant
Frame rate                               : 23.976 (24000/1001) FPS
Color space                              : YUV
Chroma subsampling                       : 4:2:0 (Type 2)
Bit depth                                : 10 bits
Bits/(Pixel*Frame)                       : 0.251
Stream size                              : 40.4 GiB (90%)
Default                                  : Yes
Forced                                   : No
Color range                              : Limited
Color primaries                          : BT.2020
Transfer characteristics                 : PQ
Matrix coefficients                      : BT.2020 non-constant
Mastering display color primaries        : Display P3
Mastering display luminance              : min: 0.0001 cd/m2, max: 1000 cd/m2
Maximum Content Light Level              : 1022 cd/m2
Maximum Frame-Average Light Level        : 293 cd/m2
FFmpeg#
Installing FFmpeg will not be covered here because plenty of tutorials can be found from a Google search.
Try any of these tutorials for example:
Windows
- https://windowsloop.com/install-ffmpeg-windows-10/
- https://www.thewindowsclub.com/how-to-install-ffmpeg-on-windows-10
- https://www.wikihow.com/Install-FFmpeg-on-Windows
Mac OS
Introduction#
FFmpeg is an incredibly powerful program with a myriad of command line parameters available to manipulate various multimedia formats.
Being a command line program makes FFmpeg a good choice for scripting. But currently, there is no good and comprehensive bash script for taking screenshots using FFmpeg that accounts for the necessary color matrix conversions to ensure color-accurate screenshots.
Therefore, only the standalone commands are being covered below, which means you will need to manually select the proper command for the type of file you have.
Commands:#
○ BT.709 video
ffmpeg -ss 00:05:00.000 -i "input.mkv" -vf "scale='max(sar,1)*iw':'max(1/sar,1)*ih':in_h_chr_pos=0:in_v_chr_pos=128:in_color_matrix=bt709:flags=full_chroma_int+full_chroma_inp+accurate_rnd+spline" -pix_fmt rgb24 -vframes 1 screenshot1.png
ffmpeg -ss 00:04:00.000 -i "input.mkv" -vf "fps=1/60, scale='max(sar,1)*iw':'max(1/sar,1)*ih':in_h_chr_pos=0:in_v_chr_pos=128:in_color_matrix=bt709:flags=full_chroma_int+full_chroma_inp+accurate_rnd+spline" -pix_fmt rgb24 -vframes 5 screenshot-%02d.png
ffmpeg -ss 00:05:00.000 -i "input.mkv" -vf "scale=in_h_chr_pos=0:in_v_chr_pos=128:in_color_matrix=bt709:flags=full_chroma_int+full_chroma_inp+accurate_rnd+spline" -pix_fmt rgb24 -vframes 1 screenshot1.png
ffmpeg -ss 00:04:00.000 -i "input.mkv" -vf "fps=1/60, scale=in_h_chr_pos=0:in_v_chr_pos=128:in_color_matrix=bt709:flags=full_chroma_int+full_chroma_inp+accurate_rnd+spline" -pix_fmt rgb24 -vframes 5 screenshot-%02d.png
The default commands contain 'max(sar,1)*iw':'max(1/sar,1)*ih' just in case your file is anamorphic. The non-anamorphic commands have also been provided separately, but there is no harm in using the default command for everything. If the file is not anamorphic, that parameter just won't do anything.
○ BT.601 video
ffmpeg -ss 00:05:00.000 -i "input.mkv" -vf "scale='max(sar,1)*iw':'max(1/sar,1)*ih':in_h_chr_pos=0:in_v_chr_pos=128:in_color_matrix=bt601:flags=full_chroma_int+full_chroma_inp+accurate_rnd+spline" -pix_fmt rgb24 -vframes 1 screenshot1.png
ffmpeg -ss 00:04:00.000 -i "input.mkv" -vf "fps=1/60, scale='max(sar,1)*iw':'max(1/sar,1)*ih':in_h_chr_pos=0:in_v_chr_pos=128:in_color_matrix=bt601:flags=full_chroma_int+full_chroma_inp+accurate_rnd+spline" -pix_fmt rgb24 -vframes 5 screenshot-%02d.png
The commands contain 'max(sar,1)*iw':'max(1/sar,1)*ih' because most BT.601 files are anamorphic.
○ BT.2020 video
ffmpeg -ss 00:05:00.000 -i "input.mkv" -vf "scale=in_h_chr_pos=0:in_v_chr_pos=0:in_color_matrix=bt2020:flags=full_chroma_int+full_chroma_inp+accurate_rnd+spline" -pix_fmt rgb24 -vframes 1 screenshot1.png
ffmpeg -ss 00:04:00.000 -i "input.mkv" -vf "fps=1/60, scale=in_h_chr_pos=0:in_v_chr_pos=0:in_color_matrix=bt2020:flags=full_chroma_int+full_chroma_inp+accurate_rnd+spline" -pix_fmt rgb24 -vframes 5 screenshot-%02d.png
Usage:
-
The Single command takes one screenshot at the 5min mark with the filename
screenshot1.png. -
The Multiple command takes 5 screenshots, 1 every 60 frames. Given a timecode of
00:04:00.000, it seeks to the 4min mark first and then seeks 60 frames ahead for the first screenshot.- To take a screenshot every 10 instead of 60 frames, change
fps=1/60tofps=1/10. - To take 3 instead of 5 screenshots, change
-vframes 5to-vframes 3. - To start at the 3min30s mark instead of 4min mark, change
00:04:00.000to00:03:30.000.
- To take a screenshot every 10 instead of 60 frames, change
Description of all the parameters:
| Parameter | Description |
|---|---|
-ss 00:05:00.000 |
Seek to timecode of 5 minutes. |
-i input.mkv |
Filename of the input video. |
fps=1/60 |
Take a screenshot every 60 frames. (See footnote link 8) |
'max(sar,1)*iw':'max(1/sar,1)*ih' |
Scale the video to the display resolution (for anamorphic video). |
in_h_chr_pos=0:in_v_chr_pos=128 |
Set the chroma location to "left", which is what most formats use. |
in_h_chr_pos=0:in_v_chr_pos=0 |
Set the chroma location to "top_left" which is used in UHD. |
in_color_matrix=bt709 |
Set the input color matrix of the video. |
full_chroma_int |
Enable full chroma interpolation. |
full_chroma_inp |
Select full chroma input. |
accurate_rnd |
Enable accurate rounding. |
-pix_fmt rgb24 |
Force the image format to be 8-bit per channel. |
-vframes 1 / -vframes 5 |
Take 1 screenshot or 5 screenshots respectively. |
screenshot1.png |
Filename of the ouput image. |
screenshot-%02d.png |
Filenames in the format screenshot01.png, screenshot02.png. |
image%03d.png |
Filenames in the format image001.png, image002.png. |
About bloated screenshots:
With default settings, FFmpeg generates 16-bit PNG images whenever the video is 10-bit.
The above commands force the PNG to be 8-bit, which is recommended because 16-bit PNGs can be more than 5 times bigger for identical or almost identical quality.
If you wish to generate 16-bit PNGs, remove -pix_fmt rgb24 from the commands.
AviSynth+#
You should be using AviSynth+ and AvsPmod GPo build. How to set them up is beyond the scope of this wiki.
For the decoder, L-SMASH-Works, ffms2 or DGDecNV should be used. d2vsource can be used for MPEG-2 sources like DVDs.
Script:#
○ BT.709 video
LWLibavVideoSource("input.mkv")

# Insert any other operations or filtering here

ConvertToRGB(matrix="Rec709")
○ BT.601 video
LWLibavVideoSource("input.mkv")

# Insert any other operations or filtering here

ConvertToRGB(matrix="Rec601")
○ BT.2020 video
LWLibavVideoSource("input.mkv")

# Insert any other operations or filtering here

ConvertToRGB(matrix="Rec2020", ChromaInPlacement="top_left")
Replace LWLibavVideoSource with FFVideoSource if you are using ffms2. And so on for the other decoders.
For anamorphic files:
For anamorphic files, add the following line after importing the file. This will resize the video from the storage resolution to the display resolution.
z_ConvertFormat( \
    FFSAR_NUM > FFSAR_DEN ? Int(RoundHalfToEven_mod2(Float(Width)  * FFSAR_NUM / FFSAR_DEN)) : Width, \
    FFSAR_NUM < FFSAR_DEN ? Int(RoundHalfToEven_mod2(Float(Height) * FFSAR_DEN / FFSAR_NUM)) : Height, \
    resample_filter="spline36", dither_type="error_diffusion")
Alternatively, if you already know what the display resolution of the file is supposed to be, use the following:
z_ConvertFormat(width, height, resample_filter="spline36", dither_type="error_diffusion")
width and height with the proper dimensions. Each dimension needs to be an even number.
Remember that this line needs to come before the ConvertToRGB line.
VapourSynth#
For the decoder, L-SMASH-Works, ffms2 or DGDecNV should be used. d2vsource can be used for MPEG-2 sources like DVDs.
About SetFrameProp
The following script has a SetFrameProp line inserted to explicitly set the color matrix of the video, unless the video is already tagged with a color matrix.
Set intval to 1 for BT.709, 5 for BT.601, and 9 for BT.2020.
The color matrix values have been taken from VapourSynth's documentation — from the table titled Matrix coefficients (ITU-T H.265 Table E.5).
Script:#
import vapoursynth as vs
core = vs.core

src = core.lsmas.LWLibavSource('input.mkv')

if src.get_frame(0).props['_Matrix'] == 2:    # _Matrix frameprop of 2 means unspecified matrix
    src = core.std.SetFrameProp(src, prop="_Matrix", intval=1)

# Insert any other operations or filtering here

src.set_output()
For anamorphic files:
For anamorphic files, define the following function in your script to resize the video from the storage resolution to the display resolution.
resizeDAR function
def resizeDAR(clip: vs.VideoNode, exactRes: bool = False) -> vs.VideoNode:
    """
    * Odd dimensions will be rounded to the nearest even number by default (Banker's rounding).
    * If you want the unrounded dimensions, set exactRes to True.
      But exactRes True will give an RGB output (as long as at least one of the calculated dimensions is actually odd),
      so call the function at the very end of the script if going that route.
    """

    f = clip.get_frame(0) # Assume the first frame is representative of the whole stream

    if '_SARDen' in f.props and '_SARNum' in f.props:
        ffsar_num, ffsar_den = float(f.props['_SARNum']), float(f.props['_SARDen'])

    if ffsar_num == ffsar_den:
        return clip                # No modification if the clip isn't anamorphic
    elif ffsar_num > ffsar_den:
        outwidth_precise = float(clip.width) * ffsar_num / ffsar_den
        outwidth = round(outwidth_precise) if exactRes else round(outwidth_precise / 2) * 2
        outheight = clip.height
    else:
        outwidth = clip.width
        outheight_precise = float(clip.height) * ffsar_den / ffsar_num
        outheight = round(outheight_precise) if exactRes else round(outheight_precise / 2) * 2

    if exactRes and (outwidth % 2 != 0 or outheight % 2 != 0):  # RGB24 needed only if at least one dimension is actually odd
        return core.resize.Spline36(clip, width=outwidth, height=outheight, format=vs.RGB24, dither_type='error_diffusion')
    else:
        return core.resize.Spline36(clip, width=outwidth, height=outheight, dither_type='error_diffusion')
Usage:
- Resize any clip to display resolution by using
src = resizeDAR(src). Odd dimensions will be rounded to the nearest even number. -
If you do not want odd dimensions to be rounded, use
src = resizeDAR(src, exactRes=1).But beware that this gives an RGB24 output instead of YUV (as long as at least one of the dimensions is actually odd). So you will want to call this function at the end of your script, after the
SetFramePropline in the initial script that sets the color matrix.
Alternatively, if you already know what the display resolution of the file is supposed to be, use the following:
src = core.resize.Spline36(src, width=XXX, height=YYY, dither_type='error_diffusion')
XXX and YYY with the proper dimensions. Each dimension needs to be an even number.
Load the script and save the images using your previewer of choice, whether it is vspreview, VSEdit, or something else. Even AvsPmod GPo has reasonably good support for VapourSynth scripts.
Also refer to the silentaperture guide for some neat tips and functions regarding screenshots in VapourSynth.
Further Reading Material#
- https://wiki.videolan.org/Documentation:Snapshots/
- https://mpv.io/manual/master/#screenshot
- http://wiki.bakabt.me/index.php/Screenshots
- https://scribbleghost.net/2018/12/28/how-to-export-thumbnail-images-with-ffmpeg/
- http://www.avisynth.nl/index.php/Convert
- http://vapoursynth.com/doc/functions/video/resize.html
- https://ffmpeg.org/documentation.html
- https://trac.ffmpeg.org/wiki/Create%20a%20thumbnail%20image%20every%20X%20seconds%20of%20the%20video
- http://avisynth.nl/index.php/Colorimetry